
Workshop Practice
Part 1 Introduction
by Peter Wilson
In this series of articles I shall try to show how to set up a small home workshop, what tools are needed for model making and how to use them. The skills and tools needed for model building are very similar to those of my own trade of diamond mounting.
This article is aimed at the beginner rather than someone who has been modelling for a long time, but I hope that even the experts will find it of interest. We all have to start somewhere and if these articles help somebody to further their interest in kit or scratch building I'll be happy. Firstly I will describe the requirements for setting up a home workshop, then the basic tool set and how they are used. If whilst reading this there is anything that I have not made clear, please feel free to contact me through the CLAG website and I'll try harder.
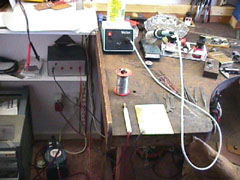
Workshop bench
It is quite possible to make a workshop and be very comfortable in a space measuring 5 foot by 4 foot. In fact you could even work in a broom cupboard or under a staircase. I know because I've done it.
Starting with the basics, try to have a firm level floor with a smooth covering such as lino or vinyl. Then, if you drop some small washer or rivet, you'll hear it hit the floor and have a fair idea of where it landed. Also, sweeping up regularly makes finding things easier.

When deciding where to place your bench, if there is a window, try to get the light coming over your right shoulder, if you are right handed. If most of your modelling is to be done at night, invest in a florescent tube light, to avoid shadows The light should be about three feet above the bench, and six inches in front of your head. A spot light will give you a more concentrated light, to much probably and if you are working in shiny metal the reflections may end up giving you a headache.
If possible the bench should be fixed to a wall, for stability, 3 feet from the floor, on timber legs of 2"x2". I usually fix a 3"x2" baton to the wall and fix the bench top onto it. The main thing is that the bench top is firm and level. A thickness of no less than 1.25", depth of a standard 2 feet and the length no less than 3 feet, more if you have room. If the top is of wood, seal it with a wood sealant.
A good bench can be made from a kitchen top offcut, but choose the colour, if possible, so that those tiny bits of etches can be seen. A light oak is favourite.
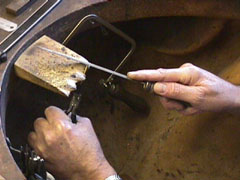
You may like to make a jeweller's type bench, very simply it is a normal bench with a semicircular piece, about 15" radius, cut out of the centre front. An oak "pin" rebated into it. (See photo.)
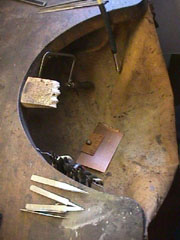
Using a pin to support your work is much more comfortable than the edge of the bench. But more of that later. The pin must be very firmly fixed to the bench. Jeweller's benches have the pin mortised into the centre of the semicircular cut out such that the top of the pin and the top of the bench are level and the pin slopes down towards the worker.
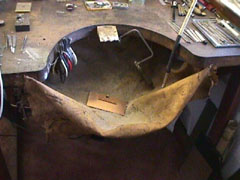
A sheepskin is tacked below the bench to catch anything dropped into it, very expensive nowadays, the sheepskin that is, but a leather substitute or a piece of heavy linen will be fine.
The skin, which is about 3 feet square, should be tacked, or tied to eye hooks, to the underside of the bench so that, when sitting at the bench, it just touches your legs, and forms a pouch that will catch anything you may drop into it.
To hang the skin, sit at the bench with the skin on your lap and tack the rear part some inches behind the pin. Tack the sides temporarily so that the skin is just lifted off your lap, but check that it does not impede free movement of your arms for actions such as filing or sawing. If it is forming a nice pouch, continue to tack the rest at about six inch spacing until all is secure. Raise the front of the skin about an inch, so that things do not fall out when you stand up. Put a small object, say a nut or washer, into the skin and tap the side of skin. If the washer ends up just under the pin and does not fall out when you leave the bench, then the skin is hanging correctly. If you imagine that whatever is lying in the skin is made of gold you'll get the general idea.
Originally, the piece cut from the front of the bench was made into a three legged stool, which was surprisingly comfortable, but an adjustable secretary's chair is probably better.
If space is really at a premium consider a fold away arrangement, hinging the rear of the bench to the wall baton with the legs hinged to the bench. The legs will need some bracing with this arrangement and you'll have to clear the top off to pack it all away, but it will save on space and arguments! I've put a bench in a cupboard this way!
Chair
It's very important to be comfortable when siting at a bench. I use the gas-lift typist chair as supplied by Viking Direct, which allows me to go up or down as needed. You will have to find the best height at which to sit for yourself. As a rough guide, get the middle of your upper arm level with the bench and the pin pointing at your sternum when sitting up straight.
Electricity supply
A most important consideration is the electricity supply. You will use a soldering iron, and a light fitting. Later you may want a resistance soldering unit, an electric drill, an air compressor, a CD player and most of all, a test track? Consider if you might need to install a drill press or a lathe at a later date. It is not within the scope of this article to comment on electrical installation, but please make sure that you can isolate your workshop's electricity supply quickly and safely. Avoid loose wires that someone could trip over. Keep electric wires off the work surface. Make sure that the fuses being used are the correct rating for the task!
If you are not sure consult a qualified electrical engineer!!
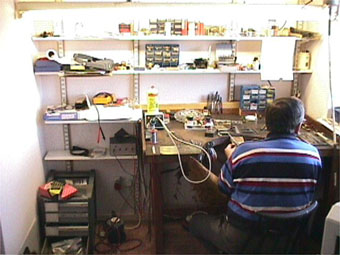
Storage
Everyone has differing needs regarding storage. A little thoughtful planning goes a long way. There will be shelf space above the bench, but it will be obscured by the light fittings. The high shelves are great for all those kits that you haven't got round to (we all have them), but for tools and the work in hand it is best if you didn't have to reach over the bench. If you use plastic multi-drawer cabinets for those little parts, get them off the bench so that the bottom drawers can be opened freely. A drawer, 3" to 4" deep can be hung under the bench below the pin for small tools. Best of all, if you can afford it, is a 15-drawer steel cabinet standing next to the bench. The most important thing is to be comfortable. Try different set-ups until it feels right.
|
|
Tools
It has been said before but it's worth saying again, always buy the very best that you can afford.I have a hand made French saw-frame that I bought forty-seven years ago which cost £2/10/0 (six weeks wages!), but I'm still earning my living with it.
Tools can be divided into two main categories; Hand tools and powered tools. Hand tools can be sub-divided into different uses i.e. measuring, marking, cutting, forming, holding, soldering, drilling etc.
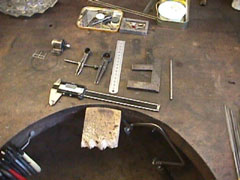
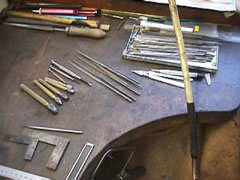
Measuring and marking out
You will need a six inch ruler, preferably stainless, marked with inches and millimetres. Make sure that the lines are clear and easy to read. The RABONE No 64 R is a rustless, chrome face series which are ideal. (12" 64 FR). A set square 3" or 4", a pair of dividers with fine points. I use a sewing needle held in a pin vice as a scriber. As soon as you can afford it, get an electronic digital calliper, they are the most wonderful thing since sliced bread. By the way, if you've not yet done it, go metric. You know it makes sense.
Cutting
A saw frame, sometimes called a jeweller's piercing saw, together with some blades. There are saw frames on the market which are adjustable for length, but I have never used the facility, when I break a blade I put in a new one. The blades you will need for general work when cutting 0.5mm to 1mm thick metal are 2/0 size. Thinner metal will need 4/0 and for thicker metal some 0/0. Ask for round back blades. I cannot say that I favour English saw-blades. The Swiss or German are of better quality. A good blade should cut in a straight line or turn corners when required and stay sharp for a reasonable time.
A pair of hand shears or tin-snips are the correct thing for cutting metal but a small strong pair of scissors with a fine point may be better for some etch work. If you have the money get a good quality pair of side cutters. Make sure that they will cut piano wire without denting the blades. A good pair of side cutters will leave one of the cut edges almost flat. Treat yourself to a scalpel handle No.3 and some blades, No.10a or No.11. A pen knife with one blade a bit blunt on the cutting edge is also useful.
Holding
Having marked out the work and cut it out, you need some pliers to hold it with. A pair of flat nose, a pair of snipe or points, and a pair of fine round nosed will be enough to begin with. Make certain that the pliers have a 'box joint'.
Don't make the mistake of buying pliers that are too small. Five inch are standard. There are pliers on the market which are smaller, but they stick into the ball of your thumb and any prolonged use will give you cramp. If you spot pliers with wide handles, go for them. The types with plastic handle covering and springs may look fancy but you will probably find that the springs break after a time, although the colour coded plastic will help locating them.
A good pair of pliers should lay comfortably in the palm of the hand, between the ball of the thumb and the first three fingers with the little finger curled or hooked behind the handle to facilitate opening and closing.
When it comes to soldering, which you will do many times, I doubt if your fingers will be as tough as mine, so get hold of some "bobby clips", which are those spring clips that girls use whilst setting their hair.
Get a few pairs of tweezers, stainless steel, No.3 or 4 for the fine things and AA for rougher work.
For holding wire and drills etc. you will need a pin vice, also known as a broach holder. They come in various lengths from 90mm to 120mm. Get the largest. There are different types, some with four removable four jaw chucks, which I recommend, and some with double ended chucks which I do not. The chucks hold work from 0mm up to 3mm.
© Peter Wilson
January 2000
| Return to top of page | Safety, privacy and cookies |