BR steel-sided Lowfits
by Russ Elliott, Tony McSean and Simon Dunstall
The Red Panda BR diagram 1/002 steel-sided Lowfit, by Russ Elliott, December 1998
The Red Panda kit, as supplied, covers one particular batch of lowfits with the BR 'clasp' brake. Other batches require LNE or RCH clasp brakes, and the instructions give the relevant Parkside reference numbers for the required bits and pieces. Alternative pocket ends (with their couplers) are supplied for the matched pair versions of the lowfits, but the bolsters are not, the relevant Parkside bits again being referenced.
The kit's instructions are clear, comprehensive and honest: although they advise on the need for the possibility of shimming up or trimming down any parts to ensure a good fit, I found the main body shell, floor and solebars went together like a dream – the locking of the body sides to the ends being particularly neat and ingenious. The quality of the mouldings, both on the body (a realistic bauxite colour) and the black chassis parts, was of the highest order, with very low release angles and almost negligible moulding die-lines – the only part requiring work being the top of the floor, which benefitted from a light sanding to eliminate some moulding inequalities.
As a P4 modeller, I fitted W-irons (Scalefour Stores does the correct BR pattern), and most of the work on this kit involved the usual cutting and filing away of the moulded W-irons, fitting the boxes and springs to the metal replacements, and the fiddly work in getting the clasp brake gear fixed onto the new W-iron units. This is no criticism of the kit of course – for those not wishing to compensate, the parts as supplied are of excellent quality. With a minimal distance between railhead and floor underside, the rocking W-iron has to be pivoted on a rod through its centre hole, rather than using the more conventional etched rocking unit.
The chassis does not give all the internal clasp brake fittings, but pragmatically gives all the bits that are visible. The only extras I fitted were the pull rods (20 thou plastic rod) between the brake shoes. The brake gear is a trifle fiddly, and I found it useful to pin the main pivot points of the levers with 20 thou rod, the main central shaft being of 30 thou rod. The brake parts as supplied are good, but can be made to look even better by thinning down their visible edges. Coupling hooks are not supplied in the kit, which is fine by me, and I fitted MJT cast ones. The omission of vacuum pipes from the chassis kit was strange however, and perhaps the only minor criticism I would make in the 'what you need to complete the kit' department: I fitted modified ABS F324 'hanging' types. A definite black mark however has to go to the buffer centres, and this manufacturer joins the alarmingly large band who think the dimension is anything else but close to 22.8mm. The plastic buffer heads supplied looked a bit weak and 'flat' on their front faces, so I fitted some spare Slaters heads into new turned plastic shanks. After finishing the vehicle, I found out that the buffer heads should be 13" diameter rather than the 12" ones I fitted, so I will be fitting some MJT 13" heads in the future. The underside of the floor was fitted with as much lead sheet as possible, but even so, this wagon is going to be a bit on the light side.
There are further improvements that can be made, the most major of these being the fitting of the 12 (4 on each side, plus 2 on each end) lashing-down rings set into recesses in the decking. Cut-outs have to be made in the floor, and replacement sections of 20 thou, half the floor thickness, can then be set in. On top of these I place rings (12 thou wire wound around a small drill) with a minute plasticard cleat. This was very fiddly work, and, assuming that all the lowfits had these rings fitted, the kit's floor should really have had this feature moulded in from the start. Having said all that, I can't be absolutely sure all these vehicles were fitted with deck rings.
The 16 side and end hinges, which are a tad too short on the mouldings, were replaced by 30 thou plastic rod, with a slight flat filed on one side to give a good welding key. The prominent solebar to underfloor triangular gusset plates were added, as were the small angle horizontal pieces between the the lower edge of the solebar and the headstocks. Vacuum pipe stowing retainers on their hooks were added.
Transfers were Woodhead.
This is one of the best plastic kits I have come across, and it was a real joy to build. For what I believe is a first effort, McKendrick Models have produced a fabulous little kit, and at only approxinately £3 (maybe a bit more now), even without wheels or transfers, is extremely good value.
References An excellent drawing is given in 'An Illustrated History of BR Wagons, Volume One' (OPC), by Messrs Bartlett, Larkin, Mann, Silsbury and Ward.
|
Variations on the Red Panda Kit, by Tony McSean, April 2000
Russ' comments are extremely helpful to anyone wishing to make the best of this excellent kit, and if I had seen them before building my two examples they would be better than they are. These notes are intended to provide some pointers to anyone interested in including some variety to their lowfits. On both wagons, the lettering is from the Fox range of decals, which can work out expensive initially but which I have found more tolerant of clumsiness and ineptitude than the finer HMRS pressfix range. I can do no better than confirm that this is a well-produced, kit which even with all the add-on bits represents excellent value for money and is a straightforward and satisfying modelling project. |
|
|
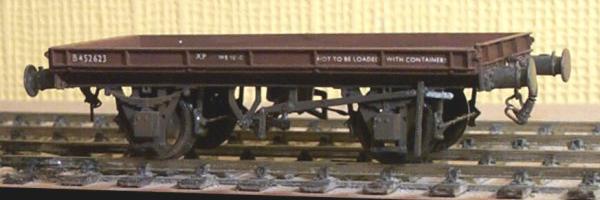
B452623 was built more or less as the kit came out of the bag, except that like Russ I added some of the brake rigging (but in brass wire rather than plastic rod because I am hopelessly hamfisted when handling models and plastic rigging often doesn't make it intact back to the workbench). I also substituted an ABS cast vacuum cylinder because I find the Parkside one a little anorexic. The final variation was to substitute MJT BR heavy-duty buffers.
|
|
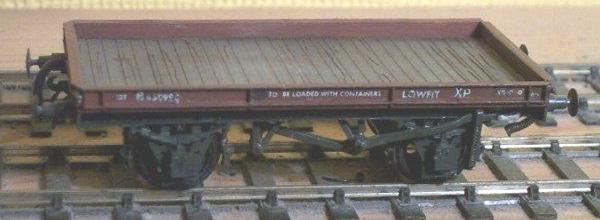
I did a little more work to B450995 to back-date it to the original style of BR lowfit. The main change to the body is to pare away carefully three of the vertical strengthening ribs to conform with the original style of side panel. This has the advantage of making the lettering process a bit less fiddly than on the 9-rib side which comes with the kit. Just for variety I fitted BR hydraulic buffers, again from MJT. Copying a David Larkin picture, I also changed the brake gear. Apparently a lot of the early wagons were built with the LNER style of asymmetric fitted gear, and this wagon was fitted with the ABS version, together with an ABS cylinder and some representational rather than deadly accurate brass wire rigging.
|
Lowfit spotting, by Simon Dunstall, August 2003
The following table gives references to photographs of lowfits and summarises their details. For all of the vehicles in the table the label clips are positioned to the right of the centre of the left w-iron (i.e. between the rightmost w-iron legs) and builder's plates are placed centrally above the left w-iron.
In the Axleboxes column the general axlebox types are platefront and split. Within these types are the platefronts with two bolts arranged in vertical alignment ("Plate (BV)") or horizontal alignment ("Plate (BH)"), and split axleboxes that either have a 'top' with a notch ("Split (NT)") or a 'top' that is are smooth ("Split (ST)").
The lot numbers for diagram 1/002 lowfits include: 2194 (Shildon 1951), 2420 (Shildon 1953), 2461 (Shildon 1957), 2729 (Shildon 1957) and 2998 (Shildon 1959).
| Number | Lot number | Photo date | Photo location | Body variant | Lamp iron position | Lamp iron style | Brakes | Buffers | W-irons | Axleboxes | Couplings | Source |
| B450484 | 2194 | Nov-80 | Walsall | 5-panel | RHS of RHS buffer | U | LNER VB | 4-rib spindle | BR 2-hole | Split (NT) + Plate (BV) | screw? | * |
| B450847 | 2194 | Sep-79 | Oxford | 5-panel | ? | ? | LNER VB | 4-rib spindle | BR 1-hole | Split (NT + ST) | instanter | Cheona Railways in Profile Vol 1 Plate 4 |
| B450947 | 2194 | 1973 | Exeter | 5-panel | RHS of RHS buffer | U | LNER VB | 4-rib spindle | BR 2-hole | Plate (BV) | instanter | * |
| B451367 | 2194 | ? | ? | 5-panel | RHS of RHS buffer | U | LNER VB | ? spindle | BR 2-hole | Plate (BH) | instanter | 4mm Wagon Vol 1 pp 40 |
| B451948 | 2420 | Nov-80 | Walsall | 5-panel | Not RHS of RHS buffer | ? | Morton VB | 4-rib spindle | BR 2-hole | Split (NT + ST) | ? | * |
| B451962 | 2420 | Mar-76 | Eastleigh | 5-panel | ? | ? | Morton VB | ? spindle | BR 2-hole | Split (ST) | instanter | Illus. H. BR Wagons Plate 61 |
| B452243 | 2461 | Nov-80 | Walsall | 8-panel | RHS of RHS buffer | U | Morton VB | 4-rib spindle | BR 2-hole | Split (ST) | screw? | * |
| B452786 | 2729 | Nov-80 | Walsall | 8-panel | RHS of RHS buffer | U | Morton VB | ? spindle | BR 2-hole | Split (ST) | screw | * |
| B453013 | 2998 | Nov-80 | Walsall | 8-panel | RHS of RHS buffer | U? | BR VB | Oleo | BR 2-hole | Plate (BH) + ? | screw | * |
| B453058 | 2998 | Nov-80 | Park Royal | 8-panel | ? | ? | BR VB | Oleo | BR 2-hole | Plate (BH) | instanter | Illus. H. BR Wagons Plate 62 |
| B453320 | 2998 | Nov-80 | Walsall | 8-panel | RHS of LHS buffer ? | U? | BR VB | Oleo | BR 2-hole | Plate (BH) | screw? | * |
| B453335 | 2998 | Nov-80 | Walsall | 8-panel | RHS of RHS buffer | U | BR VB | Oleo | BR 2-hole | Plate (BH) | screw | * |
| * specific web view no longer available, but diagram 1/002 Lowfit pictures can be found at e.g. Paul Bartlett's BR wagons pictures | ||||||||||||
© Russ Elliott, Tony McSean and Simon Dunstall
First issued December 1998
Additions made in April 2000 and August 2003
| Return to top of page | Safety, privacy and cookies |